Monday, November 22, 2010

Best Loved Doll Layette

When I was a little girl I had an old doll that my mother had had when she was a little girl. I LOVED this doll, just as she had, but this doll was UGLY! It had been given a permanent look of agony. It was meant to look as though she were crying and in great need of her mommy. What I loved about this doll was that it looked very realistic. This, indeed, was the effect it had on me, as it had on my mother. Others, though, found it downright frightful. The story told me by my mother's mother was that one day at the zoo, my mother had lost this doll. A man eventually stepped on it, and upon hearing the thing give out a "mama" looked down and got a bit of a fright by the look on the baby doll's face. This story always made my Gramma giggle. She must have loved this doll, too, because she kept her for almost 30 years, until I came along and was ready for her. She replaced her cloth body, and I kept her until my little girls were old enough. The problem by this time, however, was that whatever kind of plastic she had been made with was beginning to decompose. She was no longer soft and rubbery. She had become kind of sticky. I took one last long and loving look at her and chucked her in the garbage. Sad, but true. She just wasn't the kind of doll you display in a glass cabinet.

One of my favorite stories when I was little was The Best-Loved Doll by Rebecca Caudill which is about a girl who just loves her old worn doll enough to take her to a fancy tea party eventhough she has other more "presentable" dolls. So when my friend showed me her little girl's "best loved doll," and asked me to make a little doll sling for it, I was inspired. I took it straight home and gave it a good soaking by hand, so as not to hurt it in any way. Then, to make sure it dried out in time and didn't mildew, I put her in my supper-dupper washer on spin. Oops! She came out looking like she had just been reborn. Her head was smooshed in! Aargh! Lucky for me, and everyone involved, I was able to coax that head round again. And the best part is that I must have set her in there just right so that her winkin', blinkin', and nod eyes had popped right back into place. They don't look perfect, just a little less sunken in.
It didn't take long, and Aquamarine had a sling (made from an old dress), two new diapers, and a super-soft cotton velour gown. I added the pink heart and edged the diapers in pink, because that is the little girls favorite color.
And I do want her to be tickled pink with her new baby things. I'm just hoping that I didn't wash away that certain scent....
P.S. The link for the free doll sling how-to is http://crafts.sleepingbaby.net/kidsling.html

Sunday, November 21, 2010

Comfy Cozy Quilting


I enjoy Aneela's blog, Comfortstiching, so much. After admiring her work for months, I was at last inspired to make one myself. I chose her "girl on a swing" mini quilt, so as not to overwhelm myself from the get-go with a large project. I was also interested in some instant gratification. I had so much fun. The quilt top took about one afternoon.
I still need to quilt the darn thing. I just can't decide how yet. Of all things to get stumped by! My problem is with the applique and freemotion work as opposed to the more square aspects of the quilt. At this point I'm leaning towards regular triangles in the white area and then in the ditch for the block area.

I love the way quilts make a home feel so comfy cozy. Thanks Aneela!


Friday, October 1, 2010

FULL STOP!!!

After about 2 months of trying to do and be WAY too much, I have come to my senses and slowed WAY down. Ahhhh. Much better. You see, I had so much fun posting my first knit pattern to sell and getting all of the feedback, I felt in a rush to get another one done. But with my youngest one's birthday coming up and Holloween and house cleaning (I am VERY allergic to mold and the like) and daily family this and that, well, I finally realized that I was trying to be one of those fabled superwomen. Alas, I do not want that.

So I'd like to introduce one of my chickens. Her name is Zoe, and while she's not the prettiest thing (Auracauna's make adorable chicks, but they look a little more like a relative of a vulture as adults) I like her.

Here she is eying my lovely greens growing in my garden. It's a bit of a love-hate relationship. As a gardener I love the sounds they make as they mill about, and I love that they eat weeds and slugs and snails. What I don't like, and indeed the reason for the bars separating them from my garden, is how quick and purposeful they can become when they see some lovely tender salad greens! My first planting of lettuce starts this fall was quickly snatched up by my feathered friends. They had been in the garden with me as I weeded and I was so appreciative of their company with their soft little coos and clucks as they waited to scratch anywhere I had been. At one point, however, one of them (I believe it was Ginger) looked up and noticed the oh so vulnerable red butterleaf lettuce seedlings newly planted in a barrel and tried to snag one! She thought I wouldn't notice her straining her neck to reach them! Well, I quickly shooed them all back into their fenced-in area along side the garden. I thought all was fine, until, later that day, after I had returned from some errands, I saw that they had gotten out and were back in the garden. As soon as I walked through the gate, I saw the empty barrel. With sharp words I shooed them all back into their area and replaced the worn out and broken lock. So yes, it was my fault, but still (and here is where I whine a bit) they decimated my lettuce! What's more, not a trace of their presence could be found. They didn't scratch or poop. It's like they thought I might not notice.

So I replanted. Even more this time. I added this old clawfoot full of romaine. Isn't it beautiful?! So far my raised bed/container garden is winning against the slugs, snails, weeds and an enormous oak tree that eats more than I can afford to pour into the ground. (There's my pouch sneaking into the garden.)
And here is the replanted barrel of butternut. My absolute favorite lettuce. So precious, in fact that I hand picked a few slugs out of it this morning.
Can you see the little chew holes the slugs left? No worries though. The slugs are now chicken food, and Sluggo is now sprinkled all about. All I could think as I picked up the slugs, the teeny ones even with my bare hands, is how much I love these lettuces and how much I will love feeding them to my family to be able to do something so revolting. Can you see how the lettuces are actually balling up?! I am so excited. I consider this arriving as a lettuce grower.

And here we have a small planting of kale that is so yummy and tender that I have been eating it raw. Yay! I have also been enjoying the chickweed and dandilion greens (much to the dismay of my chickens).
Well, that's it for the garden. Just one last thing I have been meaning to share...

TADAH!

It's my pencil holding floral frog creation. I found it in an estate sale and bought it just because it is old, and so well made, and therefore, must have a good use. And this is what I came up with. It fit perfectly into a wide mouthed canning jar rim and lid which became very necessary after a pen started leaking once, and it still keeps with the old and useful look.

Hope you have a lovely day!

Tuesday, August 10, 2010

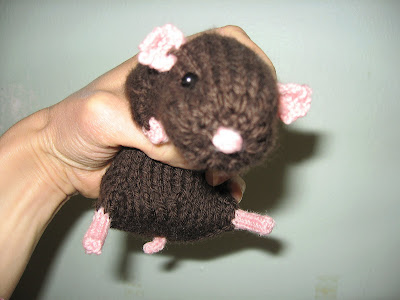
An Alternative to a Child's Need for a Furry Little Companion (or, Hold the Poo)

My solution to a child's quintessential plea to a parent: "Can I have a hamster?" I started making these about 3 years ago because my youngest, who was about 3 at the time, wanted a hamster just like her big sister. We have since had a go with multiple rodents, turned our backyard into bit of a pet cemetery, and resorted to these little cuties entirely.
I've made hairy pink ones, fuzzy grey ones, and a couple brown teddy bear hamsters during which time I have been testing my pattern. This I will be coming shortly, I promise, to my Etsy site, birdinanest.

I call it, quite simply, "Realistic Hamster Pattern." It can also be knit on a smaller scale to make a Siberian hamster, which is noted in the pattern.
Knit all in the round with one long circular needle, it's a pretty easy pattern, with a little extra attention given to the short row shaping. Wish me luck. This will be the first thing I put on my Etsy site.

Strawberries on My Mind

I seem to have strawberries on my mind lately. Every other thing I do seems to be of the strawberry theme. I have been wanting to make a strawberry garland for my kitchen for a while. So spring-y and cheerful. And while spring has passed into summer and fall is quickly approaching, I am diligently knitting away on my strawberries. I spun the yarn in my drop spindle class. I had spun once before about 15 years ago, so the yarn and myself still consider myself to be a beginner. I have since learned that Romney wool is much harder to spin than Merino. I embrace the obvious hand spun look. In fact, I am tickled pink to be able to make my own handspun!
So far I've made about 8 berries. I think I have enough wool for 5 or so more, and then I plan on getting more of the same wool in green to crochet them together on a chain vine with leaves atop each berry.

Of course I just had to choose a strawberry for my youngest's plain red dress I found in a thrift store. She wanted a bunny, but I couldn't get inspired to embroider a red bunny. Too much like the scary pink-eyed rabbits my husband used to keep, I suppose.
It took me a while to sketch out just the right one, and then to figure out how to get it onto the dress. Knits are a bit trickier to draw on. I ended up really liking my new (and expensive) marking mechanical pencil. I have since seen one in another store that has 3 different colors (darn it). I'll probably break down and buy one of those, too, mostly because I have been wanting a dependable fabric marking pencil for so long.
I spent an afternoon sitting in the backyard embroidering it.
I am very pleased with it, and my daughter is warming up to it as well.
Here's a close up. I haven't embroidered in I don't know how long. I managed to get it done though with the help of my daughters' Klutz how-to book. (Somebody should get some use out of it.) The white outline is a bit loose, but I figured it out by the green part, and I now feel pretty confident about making French knots! I did question my reasoning and vision after I had make only 5 or so when I realized how many my placement was going to require that I make. However, my stubbornness made me press on!

More later on the garland.

Friday, July 16, 2010

BIG New Cloth Lunch Bag

My hubbie needs an new lunch bag, and I'm just the gal to make him one. I will make it way better than his old one. This one will be big enough for the quantities any full grown, bike commuting guy needs. It will easily fit his stainless steel food container. And it will keep his food warm or cold until his lunch break....
I chose bike fabric in honor of his bike commuting commitment. I bought a fat quarter (love those), and found that it was the perfect size to make him said lunch bag. First I pressed the fat quarter folded in half with the pattern in the direction I wanted with right sides together. Then I trimmed and squared the resulting rectangle. Then I pinned it and sewed up the sides and bottom with an edging seam. I also made a pin-tuck sized seam along the folded side to make a mock seam. The resulting rectangle's finished dimensions while it was still inside out were 17.5" by 10.5".


Next I did the same with the liner fabric and the Insul-Brite. When I seamed the sides and bottom, however, I took a slightly larger seam, say 1-2 mm deeper, to help the bulk of the liner and insulation fabric fit inside the outer layer. Make sure to lay the liner fabric on the inside of the Insul-Bright so that the liner fabric will be on the RS. Sew around the top, through the 2 fabrics, 3/8" from edge to keep it from sliding around.

The next step was to square off the bottom of each rectangle, separately. Working with the liner rectangle first, open it up and refold it with the seams in the middle of the sides, folding the bottom a bit like Kermit the Frog's head.
Using the seams as guides, measure down 2' perpendicularly, and draw a line making a triangle out of the pointed end. (Each length of the line on either side of the seam should be the same. Also, this entire line is about the width of the stainless steal box.) When I did this next to the outer layer, I only measured down 1 7/8" to make it a little roomier than the inner layer, which helped the two layers lay flat against each other.

I checked my measuring by holding the two points together to see if the ends lined up. They did. (Yay!)
I did the same to the outer layer and, once I was sure I had measured and sewn where I had intended, I trimmed off the extra fabric.
Then I turned the outer layer RS out and placed it inside the inner layer, lining up the bottom edges and alternating the side seam so as not to make too big a seam to have to sew through. I pinned the seamed sides and then half-way between them to keep the unlined layer from stretching out of shape as compared to the lined layer, and to make sure my 2 layers fit together evenly. I left the back open for turning and to insert my elastic button loop. I like to use these tiny hair elastics because they come in so many nice colors. Also I have them all over my studio since they are my favorite knitting stitch markers.


I pinched the seamed edge of the elastic together and tacked it into place when I sewed up the opening by hand.

Almost done now, I pressed the edge flat and edge stitched around the top 1/4" from the edge. This also reinforced the elastic loop.

Finally, to give my hubbie the ability to make his lunch bag fit the amount he packed for the day, I sewed, not 1, but 3 buttons, centered down the front (that is to say the opposite side from the side with the loop).


All done! Yay! I think he will like it. I can't wait to give it to him for his birthday next week.

To recap the materials I used:
2 fat quarters
1 fat quarter of Insul-Bright
thread
3 buttons
1 small elastic hair band.


Monday, July 12, 2010

Homemade Mini Kitchen


Now, I am certainly not very handy when it comes to building things with wood, but I actually managed this. In all honesty, I cheated a bit. I started with an old child's headboard I found at a garage sale for $4. The rest of it I hobbled out of scraps of wood my husband had lying about. I basically made a frame grow out of the headboard with 2 X 2's (remember it's just what I had on hand) and then covered it with plywood or shelving scraps. I stuck it all together with screws, some intended for wood, some not. It's not perfect, but cute enough that my girls and I are happy with it.

The knobs are old wooden toy wheels, and the faucet and handles are from their block box. (Which all hail from the thrift store, too.) The little shelf also comes from the block box. The sink is an old metal wash tub, also from a garage sale. For the star-shaped burners, I held a piece of card board up to the star in the headboard and traced the shape to make a stencil. Finally, the curtain gives it that cozy, homey feel, and helps hide the chaos found in so many well-used kitchens. (You may not be able to see that the fabric has teeny mice and yellow cheese wedges all over it, which I found on sale at the lovely Piece by Piece.) And so that's how I managed to give my kidos (and me!) a real wooden play kitchen, even when I just could not afford one at the store or online.


P.S. I also got a little help sawing and sanding from my girls. Not much, but enough for them to say they helped. ;)

Wednesday, June 30, 2010

A Simple and Soothing Homemade Facial Cleanser


Finally, and after way too much to do, I have found a way to cleanse my face without irritating it or drying it out. What I love about this stuff is that it is soooo cheap to make and it is even easy to use. Also, since in is just ground up dried ingredients, it is easy to store and has a long shelf life. I started by just grinding up rolled oats into a fine powder. (Anything coarse would be too rough for daily use.) Then, the next day I read in The Herbal Body Book by Stephanie Tourles that adding water to this and leaving it on for about 15 minutes is a good idea. Well, I must have misread, since I can't find it anywhere now, but I added hot water while I was making tea. I guess I just always make oatmeal with hot water. So I let it cool, and then applied it all over my face and upper neck for 15 minutes (scared my husband a wee bit, the first time I did this). And get this! I don't have to sit with my head under a towel and over a hot bowl of water. I can fold towels, clean the kitchen, or even something funner. It was like a walking steam facial because when I rinsed it off with cool filtered water (chlorine is drying) my pores were tiny! The oatmeal was so soothing and my skin was left clean, blackhead free and moisturized. (I am no spring chick and so my mature skin appreciates this.) The next day I got fancy and added calendula flowers, rose petals and lavender flowers (all dried, of course) before I ground it. I am in love! AND it did not cost me beaucoup. Next time I use it, I am going to use some of my jasmine green tea instead of plain water. (I am actually excited about washing my face. Now if I can just make brushing and flossing exciting.)

P.S. I used a small electric coffee bean grinder. The kind that has a button on the lid, and the lid converts into a little dish. Enjoy!

Gluten-Free Baking Day

Yay! A truly malleable AND all natural gluten-free dough. This dough was so lovely that I was able to do this:

Now this was just a test, so it's nothing fancy, but bubbling with a smidgen of rice syrup and just a touch of butter, it tasted so, SO good! I felt like an old farm girl in her kitchen, again. With my apron on and wooden spoon in hand, I mixed and molded, and ate the whole thing right up. Yumm!


I adore whole grain moist breads. It is what I miss most being gluten-free. But here I have it once again. This trial run with the remaining dough from the tarte and cheese cake crust (which I will make today) will next be turned into cinnamon rolls. I can't wait to serve a batch of those to my family. I also believe that I will be able to turn this dough into pizza dough with a few minor changes and into sugar cookies, too.

I have been working for about 3 years now on developing just such a dough without all of the super-processed starches and xanthan gum. I base my recipes on gluten-free, whole grain flours, and other old fashioned ingredients like milk, butter, and honey or rice syrup. I have made these with sugar and soy or rice milk, also and they work equally as well. My goal is to be gluten-free without being so processed and starchy which many celiacs eventually develop sensitivities to. I myself became so over burdened by corn starch in my diet that I can no longer eat corn of any sort or even use facial products with vegetable glycerine, since that is often if not usually made of corn. I have also noticed a nasty chemical aftertaste to all non-organic starches, which completely ruins any wholesome or organic ambiance in food.

Yay! Here's to good, old-fashioned comfort food.

P.S. That huge pile of egg shells are just being kept for our hens. No, I did not use all of those today.

Frivolities That Fit Our Frugality


"To be without some of the things you want is an indispensable part of happiness." -Bertrand Russell

Being creative with what we have. Creating beauty out of the everyday. Being without creates a spark which when fueled by need or desire turns into inspiration and creativity.

Some of my best meals have been found in a seemingly empty kitchen. That's when I look at that odd jar of say sauerkraut, purchases out of curiosity and then ignored until one week before its expiration date, and created one of our top one- pot meals. (I do not count the pot of staple brown rice as a pot, since I can practically make it blindfolded.) Hot dogs (the og, grass fed, only muscle tissue kind--the kind that tastes like the most tender steak ever) slow-cooked with sauerkraut , served over that plain rice. I more or less killed the kraut, however since to protect my young 'uns, I simmered the heck out of it. Still we have since fallen in love with the stuff, and even make our own.

My blog will thus be where I share my frugal creativity. I know that I appreciate connecting with others who share in my love of creating with cloth, yarn and food. I adore being able to make my home my career, but sometimes, it can seem a wee bit isolating. So here I go, offering my voice, and lending an ear.


P.S. The quote is from some of my favorite bedside reading, At Knit's End by Stephanie Pearl-McPhee. Also, the above picture is of me quilting my new purse. (More on that later.)